
When over time, you carry out several batches of analysis on a certified reference material (CRM) and find that the mean values are apparently to be consistently different from the expected value given in the certificate of analysis of the CRM sample, your analytical method may have a systematic error. Such error affects the method trueness and accuracy.
The assigned value of PT program
A critical step in the organization of a proficiency testing (PT) scheme is specifying the assigned value for the participating laboratories. The purpose is to compare the deviation of participant’s reported results from the assigned value (i.e. measurement error) with a statistical scoring criterion which is used to decide whether or not the deviation represents significant cause for concern in its performance.
ISO 13528:2015 defines assigned value as “value attributed to a particular property of a proficiency test item”. It is a value attributed to a particular quantity being measured. Such an assigned value will have a suitably small uncertainty which is appropriate for this interlaboratory comparison purpose.
Where do we obtain an assigned value?
A. Assigned value obtained by formulation
A specified known level or concentration of the target analyte is added accurately to a base material preferably containing no native analyte. The assigned value is then derived by calculating the analyte concentration from the masses of analyte used. By this way, the traceability of the assigned value can usually be established.
However, there may be no suitable base material (blank material) or well characterized base material available. Ensuring homogeneity in the prepared bulk material before distributing to the participants may also be a challenge. Furthermore, formulated samples may not be truly representative of test materials as the analyte may be in a different form from the less strongly bound to the matrix.
B. Assigned value is a certified reference value
In this case, the test material is a certified reference material (CRM) made by a reputable organization and the assigned value is therefore the certified value and its uncertainty are quoted on the CRM certificate. The limitations of using this assigned value are:
C. Assigned value is a reference value
The assigned value is determined by a single expert laboratory using a suitable primary method of analysis (e.g., gravimetry, titrimetry, isotope dilution mass spectrometry, etc.) or a fully validated test method which has been calibrated with a closely matched CRM.
D. Assigned value from consensus of expert laboratories
This assigned value is obtained from the results reported by a number of expert laboratories, with demonstrated proficiency in the measurements of interest, which analyze the material using suitable methods. However, it must be cautioned that there may be an unknown bias in the results produced by the expert laboratories
E. Assigned value from consensus of PT scheme participants
This is the result from all the participants in the proficiency testing round. It is normally based on a robust estimate to minimize the effect of extreme values in the data set.
Yes, measurement error and measurement uncertainty are two different concepts but many laboratory personnel somehow cannot really differentiate them. It is utmost important for them to see their differences.
We know all measurements are affected by uncontrollable factors. No two replicated measurements give exactly the same result, except physical counting of objects.
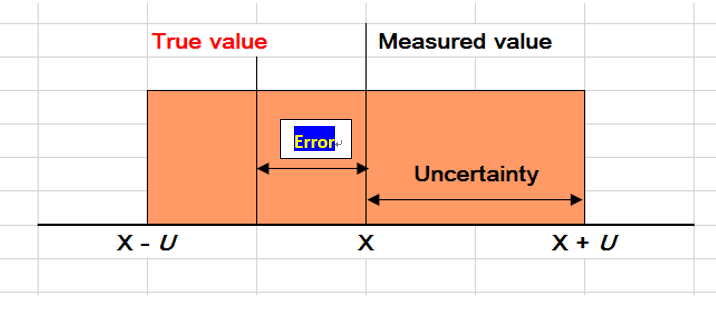
By definition. error is the difference between an individual test result and the true value of the measurand (targeted analyte) in a given sample, whilst a true value refers to the actual amount of the measurand present in the sample. In fact, all true values by nature are indeterminate, meaning that they can only be determined under perfect analysis conditions which are not achievable in practice.
If we were to use a certified reference material for our laboratory analysis, then an observed measurement error would then be the difference between the observed value and its reference or certified value which by itself carries an uncertainty as well. These values are not 100% true values!
When we find a measurement error is systematic, i.e. the measurement results differ significantly from the reference or certified value, we say the mean measurement result has a bias and such systematic error may be corrected with a correction factor, if deemed necessary. Even after the correction, the reported value still has a certain amount of error.
Measurement uncertainty, on the other hand, is expressed in the form of a range or interval after evaluating all contributions of uncertainty factors, and, if estimated for an analytical method and defined sample type, may apply to all determinations so described.
The measurement uncertainty therefore tells us what size the measurement error might be, and the range would have covered the true value at a certain level of confidence, such as 95%. In general, the value of the uncertainty cannot be used to correct a measurement result.
It is important to stress that the uncertainty of the result of a measurement should never be interpreted as representing the error itself, nor the error remaining after correction.
The following sketch gives a clear picture of the differences between measurement error and measurement uncertainty.
