

This worked example illustrates the use of a certified wheat flour reference material to evaluate analytical bias (recovery) of a Kjeldahl nitrogen method for its crude protein content expressed as K-N.
Those analysts familiar with the Kjeldahl method can testify that it is quite a tedious and lengthy method. It consists of three major steps, starting from strong acid digestion of the test sample with concentrated sulfuric acid and a catalyst to form ammonium sulfate, followed by addition of sodium hydroxide to make it into an alkaline solution, evolving a lot of steam and ammonia during the process, and lastly subject to steam distillation before titrating the excess standard boric solution after reaction with the distilled ammonia gas at the steam distillate collector.
During these processes, there is always a chance to lose some nitrogen content of the sample due to volatility of reactions during the processing, and one can therefore expect to find lower K-N content in the sample than expected. Of course, many modern digestion/distillation systems sold in the market have minimized such losses through apparatus design but some significantly low recoveries do happen, depending on the technical competence and the extent of precautions taken by the laboratory concerned.
In here, a certified wheat flour reference material with a N- value of 1.851 g/100g + 0.017 g/100g was used. It was subject to duplicate analysis by four analysts in different days, using the same digestion/distillation set of the laboratory. The test data were summarized below and the pooled standard deviation of the exercise was calculated together with its overall mean value:
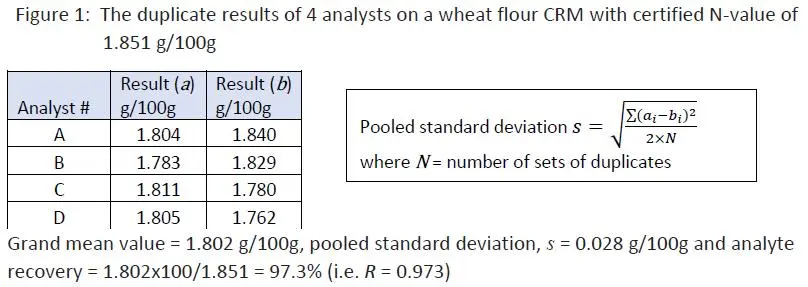
Although 97.3% recovery of the K-N content in the certified reference material looks reasonably close to 100%, we still have to ask if the grand mean value of 1.802 g/100g was significantly different from the certified value of 1.851 g/100g. If it were significantly different, we could conclude that the average test result in this exercise was bias.
A significance (hypothesis) testing using Student’s t-test statistic was carried out as described below:
Let Ho : Grand observed mean value = certified value (1.851 g/100g)
H1 : Grand observed mean value ≠ certified value

By calculation, t-value was found to be 3.532 whilst t -critical value obtained by MS Excel® function “=T.INV.2T(0.05,3)” was 3.182. Since 3.532 > 3.182, the Null Hypothesis Ho was rejected, indicating the difference between the observed mean value and the certified value was significant. We can also use Excel function “=T.DIST.2T(3.532,3)” to calculate the probability p-value, giving p = 0.039 which was less than 0.05. Values below 0.05 indicate significance (at the 95% level).
Now, you have to exercise your professional judgement if you would wish to make a correction to your routine wheat flour sample analyses posted within the validity of your CRM checks by multiplying test results of actual samples by a correction factor of 1/0.973 or 1.027.
There are a few approaches for decision making leading to a conformity statement after testing.
Simple approaches for binary decision rule involving comments of pass/fail, compliant/non-compliant:
However, to use such a rule without specifying the maximum permitted value of the uncertainty would mean the risk (probability) of making a wrong decision would not be known.

Many learned organizations like ILAC, Eurachem, etc. have suggested to consider incorporating some tolerance limits (or interval) or guard bands (say, +g) added to the nominal specification for risk decision. In this instance, a rejection zone can be defined as starting from the specification limit L plus or minus an amountg (the Guard Band). The purpose of establishing such an “expanded” or “conservative” error on the specification value is to draw “safe” conclusions concerning whether measurement errors are within acceptable limits with a calculated risk as agreed by both the customers and the laboratory concerned.
The value of g is chosen so that for a measurement result greater than or equal to L + g, the probability of false rejection is less than or equal to alpha (Type I error) which is the accepted risk level.
In general, g will be a multiple of the standard uncertainty of the test parameter, u. The multiplying factor can be 1.645 or 1.65 (95% confidence) or 3.3 (>99% confidence). That is to say that the amount of uncertainty in the measurement process and where the measurement result lies with respect to the tolerance limit set help to determine the probability of an incorrect decision.
A situation is, for example, when you set your guard band g to be the expanded uncertainty of the measurement, that is U = 2u above the upper limit of specification. In this case, your estimated critical measurement result plus 1.645u with 95% confidence is well inside the L + g zone, and hence, your risk of making a wrong decision is at 5%. This is shown graphically in Figure 2A below:
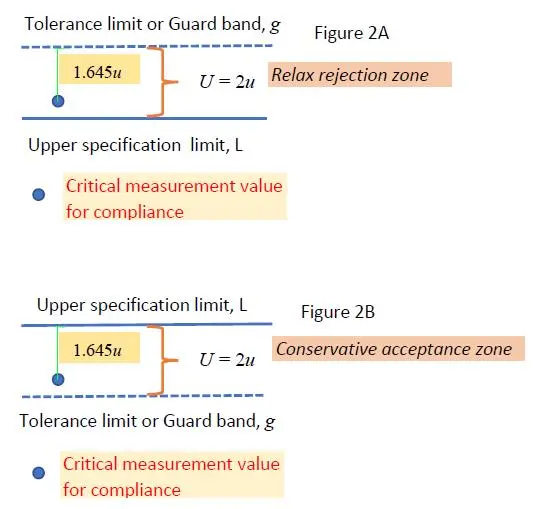
Often it is the customer who would specify such a tolerance limit as in Figure 2A, indicating that he would be happy to accept when such tolerance level or guard band is above the upper specification limit or below the lower specification limit in the rejection zones. Hence, the risk is at the customer’s side. It is also known as ‘relax rejection zone’ which covers the Type II (beta) error.
However, if the laboratory operator is to set his own risk limit, it is best for him to set the tolerance limit or guard band below the upper specification level or above the lower specification level to safeguard his own interest. It is known as ‘conservative or stringent acceptance zone’, leading to the Type I (alpha) error.
How to estimate the critical value for acceptance?
Let’s illustrate it via a worked example.
One of the toxic elements in soil is cadmium (Cd). Let the upper acceptable limit on the total Cd in soil required by the environmental consultant client as 2.0 mg/kg on dried matter. The measurand is therefore the total Cd content in soil by ICP-OES method.
Upon analysis, the average value of Cd content in soil samples, say, was found to be 1.81 mg/kg on dried basis, and the uncertainty of measurement U was 0.20 mg/kg with a coverage factor of 2 (95% confidence). Hence, the standard uncertainty of the measurement = 0.20 / 2 = 0.10 mg/kg. This standard uncertainty included both sampling and analytical uncertainties.
Our Decision rule: The critical value or the decision limit was the Cd concentration where it could be decided with a confidence of approximately 95% (alpha=0.05) that the sample batch had a concentration below the set upper limit of 2 mg/kg.
The guard band g is then calculated as:
1.645 x u = 1.645 x 0.10 = 0.165 mg/kg
where k = z = 1.645 for one-tailed value of normal probability distribution at 95% confidence.
The decision (critical) limit therefore = 2.0 – 0.165 = 1.84 mg/kg.
The client would then be duly informed and agreed that all reported values below this critical limit value of 1.84 mg/kg were in the acceptance zone. Hence, the test result of 1.81 mg/kg in this study was in compliance with the Cd specification limit of 2.0 mg/kg maximum.
The guard band is often based on a multiple, r, of the expanded measurement uncertainty, U where g = rU.
For a binary decision rule, a measurement result below the acceptance limit AL = (L-g) is accepted.
The above example of g = U is quite commonly used, but there may be cases where a multiplier other than 1 is more appropriate. ILAC Guide G08:09/2019 titled “Guidelines on decision rules and statements of conformity” provides a table showing examples of different guard bands to achieve certain levels of specific risks, based on the customer application, as reproduced in Figure 3 Table 1 below. Note that probability of False Accept PFA refers to false positive or Type I error.
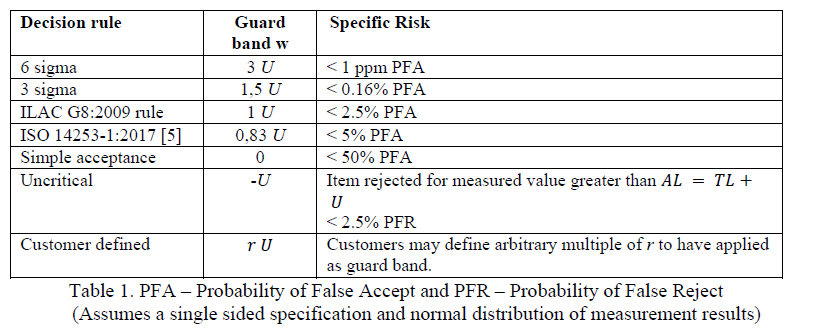
It may be noted that the multiplying factor of 0.83 in the guard band of 0.83U as given by ISO 14253-1:2017 is derived by calculation of 1.65/2, where 1.645 has been approximated to 1.65 and 2 is the coverage factor of 1.96 rounded up to the nearest integer, for 95% confidence interval.
Consider a measurement value y = 2.70ppm with a standard uncertainty of u(y) = 0.20ppm. (Its expanded uncertainty = k x 0.20ppm = 2 x 0.20ppm = 0.40ppm where coverage factor k = 2 at 95% confidence). It is also given that the single tolerance or specification upper limit of Tu = 3.0ppm.
Assuming the normal probability distribution data and a type I error alpha = 0.05 (5%), we are to make a statement of specification conformity at probability of (1-alpha) or 0.95 (95%).
Our decision rule is that : “Acceptance if the hypothesis Ho: P(y< 3.0ppm)> 0.95”is true.
Use Microsoft Excel spreadsheet function: “= 1-NORM.DIST(2.7,3.0,0.2,TRUE)” to calculate P(y< 3.0ppm) to get 0.933 or 93.3%. Note that the function “=NORM.DIST(2.7,3.0,0.2,TRUE)” gives the cumulative area under the curve from far left to right for a value of 0.067 approximately.
Alternatively, we can also calculate a normalized z -value as (2.7 – 3.0)/0.2 = – 1.50, and look up the one-tailed normal distribution table for cumulative probability under the curve with z =|1.5| which gives 0.5000 + 0.4332 = 0.9332, as a normal distribution curve is symmetrical in shape. See Appendix A for the normal distribution cumulative table. In fact, we would get the same answer if we were to use the Excel function “=1- NORM.DIST(-1.5,0,1,TRUE)” as well.
Since 93.3% < 95.0%, the Ho is rejected, i.e. the sample result of 2.70ppm can be declared non-compliant with the specification limit, or put it more mildly, “not possible to state compliance” or “conditional pass” or some other qualification wordings!
If, for discussion sake, the measured value was 2.60ppm, instead. Would it be within the upper specification limit of 3.0ppm by the above evaluation?
Indeed, by following the above reasoning, we would find that the normalized z-value as (2.6-3.0)/0.2 = – 2.0 and the cumulative area under the curve was 0.5000 + 0.4772 = 0.977 which is larger than 0.950. Therefore, the Ho is not rejected, i.e. the sample or test item is declared in compliant with the specification limit.
What is the critical acceptable value Xppm in order not to get Ho rejected?
The task will be simple if we know how to find the critical z -value in a normal distribution curve where the area under the curve on the right tail is 0.05 out of 1.00, or 5%, as we have fixed our Type I (alpha) risk as 5%.
Reading from the normal distribution cumulative table in Appendix A, we note that when z = 1.645, the area under the curve is 0.5000 + 0.4500 = 0.9500. Similarly, the absolute value of Excel function “=NORM.INV(0.05,0,1)” also gives a |z|-value 0f 1.645.
The critical acceptable value X is then calculated as below:

which gives X = 2.67ppm.
The conclusion therefore is that any test value found to be less than or equal to 2.67ppm will be declared as in compliance with the specification of 3.0ppm maximum with 95% confidence (or 5% error risk). Any value found larger than 2.67ppm will be assessed for compliant by considering the higher than 5% risk that the test laboratory is willing to undertake, probably based on some commercial reason. In other words, where a confidence level of less than 95% is acceptable to the laboratory, a compliance statement may be possible. Decision is entirely yours!

All testing and calibration laboratories accredited under ISO/IEC 17025:2017 are required to prepare and implement a set of decision rules when the customer requests for a statement of conformity in the test or calibration report issued.
As the word “conformity” is defined as “compliance with standards, rules and laws”, a statement of conformity is an expression that clearly describes the state of compliance or non-compliance to a specification, standard, regulatory limits or requirements, after calibration or testing.
Like any decision made, you have to assume a certain amount of risk as you might make a wrong decision. So, how much is a risk that you can comfortably undertake when you issue a statement of conformity in your test or calibration report?
Generally, decision rules give a prescription for the acceptance or rejection of a product based on:
Certainly, you want to minimize our risk in issuing a statement of conformity that is to be proven wrong by others. But, what is the type of risk you are answering when making such decision rule? In short, it is either
From the laboratory service point of view, you should be interested in the Type I (alpha) error to protect your own interest.
Before indulging further in the discussion, let’s take note of an important assumption, that is, the uncertainty of measurement is represented by a normal (Gaussian) probability distribution function, which is consistent with the typical measurement results (being assumed the applicability of the Central Limit Theorem).
After calibration or testing an item with its measurement uncertainty known, our subsequent statement of conformance with a specification or regulatory limits can lead us to 2 possible outcomes:
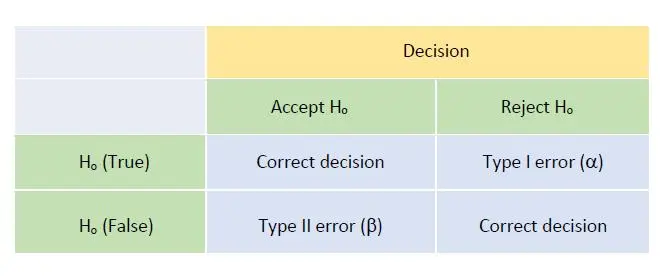
The decision rule made is related to statistical hypothesis testing where we propose a null hypothesis Ho for a situation and an alternative hypothesis H1 should Ho be rejected after some test statistics. In this case, we can make either a Type I (false POSITIVE or false ALARM, i.e. rejecting null hypothesis Ho when in fact Ho is true) or Type II (false NEGATIVE, i.e. not rejecting Ho when in fact Ho is actually false) errors.
It follows that the probabilities of making the correct decisions are (1 – alpha) and (1 – beta), respectively. Generally we would take a 5% Type I risk, hence we had alpha = 0.05 and would claim that we have 95% confidence in making this statement of conformity.
In layman’s language:
Figure 1 shows the matrix of such decision making and potential errors involved:
The statistical basis of the decision rules is to determine where the “Acceptance zone” and the “Rejection zone” are, such that if the measurement result lies in the acceptance zone, the product is declared compliant, and, if in the rejection zone, it is declared non-compliant. Graphically, it can be shown as in Figure 2 below:
Figure 2: Display of results with measurement uncertainties around specification limits
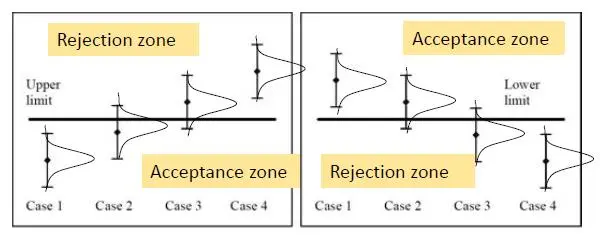
We should not have any issue in deciding the conformity in Case 1 and non-conformity in Case 4 due to a clear cut situation as shown in Figure 2 above, but we need to assess if Cases 2 and 3 are in conformity or not, as illustrated in Figure 3 below for an upper specification limit:
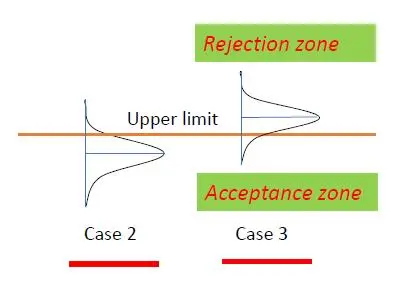
For the situations in Cases 2 and 3, we may include the following thoughts in the decision rule making before considering the amount of risk to be taken in deciding conformity:
Part B of this article will discuss both simple and more complicated decision rules that can be made during issuing statement of conformance after testing or calibration. Before that, we shall study a practical worked example.
Category:
BASIC STATISTICS Measurement uncertainty
TAGGED WITH
DECISION RULES HYPOTHESIS TESTING RISK TYPE I AND TYPE II ERRORS
In my training workshops on decision rule for making statement of conformity after laboratory analysis of a product, some participants have found the subject of hypothesis testing rather abstract. But in my opinion, an understanding of the significance of type I and type II error in hypothesis testing does help to formulate decision rule based on acceptable risk to be taken by the laboratory in declaring if a product tested conforms with specification.
As we know well, a hypothesis is a statement that might, or might not, be true until we put it to some statistical tests. As an analogy, a graduate studying for a Ph.D. degree always carries out research works on a certain hypothesis given by his or her supervisor. Such hypothesis may or may not be proven true at the conclusion. Of course, a breakthrough of the research in hand means that the original hypothesis, called null hypothesis is not rejected.
In statistics, we set up the hypothesis in such as way that it is possible to calculate the probability (p) of the data, or the test statistic (such as Student’s t-tests) calculated from the data, given the hypothesis, and then to make a decision about whether this hypothesis is to be accepted (high p) or rejected (low p).
In conformity testing, we treat the specification or regulatory limit given as the ‘true’ or certified value and our measurement value obtained is the data for us to decide whether it conforms with the specification. Hence, our null hypothesis Ho can be put forward as that there is no real difference between the measurement and the specification. Any observed difference arises from random effects only.
To make decision rule on conformance in significance testing, a choice about the value of the probability below which the null hypothesis is rejected, and a significant difference concluded, must be made. This is the probability of making an error of judgement in the decision.
If the probability that the data are consistent with the null hypothesis Ho falls below a pre-determined low value (say, alpha = 0.05 or 0.01), then the hypothesis is rejected at that probability. Therefore, a p< 0.05 would mean that we reject Ho with 95% level of confidence (or 5% error) if the probability of the test statistic, given the truth of Ho, falls below 0.05. In other words, if Ho were indeed correct, less than 1 in 20 repeated experiments would fall outside the limits. Hence, when we reject Ho, we conclude that there was a significant difference between the measurement and the specification limit.
Gone are the days when we provide a conformance statement when the measurement result is exactly on the specification value. By doing so, we are exposed to a 50% risk of being found wrong. This is because we either have assumed zero uncertainty in our measurement (which cannot be true) or the specification value itself has encompassed its own uncertainty which again is not likely true.
Now, in our routine testing, we would have established the measurement uncertainty (MU) of test parameter such as contents of oil, moisture, protein, etc. Our MU as an expanded uncertainty has been evaluated by multiplying a coverage factor (normally k = 2) with the combined standard uncertainty estimated, with 95% confidence. Assuming the MU is constant in the range of values tested, we can easily determine the critical value that is not significantly different from the specification value or regulatory limit by the use of Student’s t-test. This is Case B in the Fig 1 below.
So, if the specification has an upper or maximum limit, any test value smaller than the critical value below the specification estimated by the Student’s t-test can be ‘safely’ claimed to be within specification (Case A). On the other hand, any test value larger than this critical value has reduced our confidence level in claiming within specification (Case C). Do you want to claim that the test value does not meet with the specification limit although numerically it is smaller than the specification limit? This is the dilemma that we are facing today.

The ILAC Guide G8:2009 has suggested to state “not possible to state compliance” in such situation. Certainly, the client is not going to be pleased about it as he has used to receive your positive compliance comments even when the measurement result is exactly on the dot of the upper limit.
That is why the ISO/IEC 17025:2017 standard has required the accredited laboratory personnel to discuss his decision rule with the clients and get their written consent in the manner of reporting.
To minimize this awkward situation, one remedy is to reduce your measurement uncertainty range as much as possible, pushing the critical value nearer to the specification value. However, there is always a limit to do so because uncertainty of measurement always exists. The critical reporting value is definitely going to be always smaller than the upper limit numerically in the above example.
Alternatively, you can discuss with the client and let him provide you his acceptance limits. In this case, your laboratory’s risk is minimized greatly as long as your reported value with its associated measurement uncertainty is well within the documented acceptance limit because your client has taken over the risk of errors in the product specification (i.e. customer risk).
Thirdly, you may want to take a certain calculated commercial risk by having the upper uncertainty limit extended into the fail zone above the upper specification limit, due to commercial reasons such as keeping good relationship with an important customer. You may even choose to report a measurement value that is exactly on the specification limit as conformance. However, by doing so, you are taking a 50% risk to be found err in the issued statement of conformance. Is it worth taking such a risk? Always remember the actual meaning of measurement uncertainty (MU) which is to provide a range of values around the reported number of the test, covering the true value of the test parameter with 95% confidence.

Today there is a dilemma for an ISO/IEC 17025 accredited laboratory service provider in issuing a statement of conformity with specification to the clients after testing, particularly when the analysis result of the test sample is close to the specified value with its upper or lower measurement uncertainty crossing over the limit. The laboratory manager has to decide on the level of risk he is willing to take in stating such conformity.
However, there are certain trades which buy goods and commodities with a given tolerance allowance against the buying specification. A good example is in the trading of granular or pelletized compound fertilizers which contain multiple primary nutrients (e.g. N, P, K) in each individual granule. A buyer usually allows some permissible 2- 5% tolerance on the buying specification as a lower limit to the declared value to allow variation in the manufacturing process. Some government departments of agriculture even allow up to a lower 10% tolerance limit in their procurement of compound fertilizers which will be re-sold to their farmers with a discount.
Given the permissible lower tolerance limit, the fertilizer buyer has taken his own risk of receiving a consignment that might be below his buying specification. This is rightly pointed out in the Eurolab’s Technical Report No. 01/2017 “Decision rule applied to conformity assessment” that by giving a tolerance limit above the upper specification limit, or below the lower specification limit, we can classify this as the customer’s or consumer’s risk. In hypothesis testing context, we say this is a type II (beta-) error.
What will be the decision rule of test laboratory in issuing its conformity statement under such situation?
Let’s discuss this through an example.
A government procurement department purchased a consignment of 3000 bags of granular compound fertilizer with a guarantee of available plant nutrients expressed as a percentage by weight in it, e.g. a NPK of 15-15-15 marking on its bag indicates the presence of 15% nitrogen (N), 15% phosphorus (P2O5) and 15% potash (K2O) nutrients. Representative samples were drawn and analyzed in its own fertilizer laboratory.
In the case of potash (K2O) content of 15% w/w, a permissible tolerance limit of 13.5% w/w is stated in the tender document, indicating that a fertilizer chemist can declare conformity at this tolerance level. The successful supplier of the tender will be charged a calculated fee for any specification non-conformity.
Our conventional approach of decision rules has been based on the comparison of single or interval of conformity limits with single measurement results. Today, we have realized that each test result has its own measurement variability, normally expressed as measurement uncertainty with 95% confidence level.
Therefore, it is obvious that the conventional approach of stating conformity based on a single measurement result has exposed the laboratory to a 50% risk of having the true (actual) value of test parameter falling outside the given tolerance limit, rendering it to be non-conformance! Is the 50% risk bearable by the test laboratory?
Let say the average test result of K2O content of this fertilizer sample was found to be 13.8+0.55%w/w. What is the critical value for us in deciding on conformity in this particular case with the usual 95% confidence level? Can we declare the result of 13.8%w/w found to be in conformity with specification referencing to its given tolerance limit of 13.5%w/w?
Let us first see how the critical value is estimated. In hypothesis testing, we make the following hypotheses:
Ho : Target tolerance value > 13.5%w/w
H1 : Target tolerance value < 13.5%w/w
Use the following equation with an assumption that the variation of the laboratory analysis result agrees with the normal or Gaussian probability distribution:
where
mu is the tolerance value for the specification, i.e. 13.5%,
x(bar) , the critical value with 95% confidence (alpha- = 0.05),
z, the z -score of -1.645 for H1’s one-tailed test, and
u, the standard uncertainty of the test, i.e. U/2 = 0.55/2 or 0.275
By calculation, we have the critical value x(bar) = 13.95%w/w, which, statistically speaking, was not significantly different from 13.5%w/w with 95% confidence.
Assuming the measurement uncertainty remains constant in this measurement region, such 13.95%w/w minus its lower uncertainty U of 0.55%w/w would give 13.40% which has (13.5-13.4) or 0.1%w/w K2O amount below the lower tolerance limit, thus exposing some 0.1/(2×0.55) or 9.1% risk.
When the reported test result of 13.8%w/w has an expanded U of 0.55%w/w, the range of measured values would be 13.25 to 14.35%w/w, indicating that there would be (13.50-13.25) or 0.25%w/w of K2O amount below the lower tolerance limit, thus exposing some 0.25/(2×0.55) or 22.7% risk in claiming conformity to the specification limit with reference to the tolerance limit given.
Visually, we can present these situations in the following sketch with U = 0.55%w/w:

The fertilizer laboratory manager thus has to make an informed decision rule on what level of risk that can be bearable to make a statement of conformity. Even the critical value of 13.95%w/w estimated by the hypothesis testing has an exposure of 9.1% risk instead of the expected 5% error or risk. Why?
The reason is that the measurement uncertainty was traditionally evaluated by two-tailed (alpha- = 0.025) test under normal probability distribution with a coverage factor of 2 whilst the hypothesis testing was based on the one-tailed (alpha- = 0.05) test with a z-score of 1.645.
To reduce the risk of testing laboratory in issuing statement of conformity to zero, the laboratory manager may want to take a safe bet by setting his critical reporting value as (13.5%+0.55%) or 14.05%w/w so that its lower uncertainty value is exactly 13.5%w/w. Barring any evaluation error for its measurement uncertainty, this conservative approach will let the test laboratory to have practically zero risk in issuing its conformity statement.
It may be noted that the ISO/IEC 17025:2017 requires the laboratory to communicate with the customers and clearly spell out its decision rule with the clients before undertaking the analytical task. This is to avoid any unnecessary misunderstanding after issuance of test report with a statement of conformity or non-conformity.
In carrying out routine testing on samples of commodities and products, we normally encounter requests by clients to issue a statement on the conformity of the test results against their stated specification limits or regulatory limits, in addition to standard reporting.
Conformance testing, as the term suggests, is testing to determine whether a product or just a medium complies with the requirements of a product specification, contract, standard or safety regulation limit. It refers to the issuance of a compliance statement to customers by the test / calibration laboratory after testing. Examples of statement can be: Pass/Fail; Positive/Negative; On specification/Off specification.
Generally, such statements of conformance are issued after testing, against a target value with a certain degree of confidence. This is because there is always an element of measurement uncertainty associated with the test result obtained, normally expressed as X +/- U with 95% confidence.
For example, if the specification minimum limit of the fat content in a product is 10%m/m, we would without hesitation issue a statement of conformity to the client when the sample test result is reported exactly as 10.0%m/m, little realizing that there is a 50% chance that the true value of the analyte in the sample analyzed lies outside the limit! See Figure 1 below.

In here, we might have made an assumption that the specification limit has taken measurement uncertainty in account (which is not normally true), or, our measurement value has zero uncertainty which is also untrue. Hence, by knowing the fact that there is a presence of uncertainty in all measurements, we are actually taking some 50% risk to allow the actual true value of the test parameter to be found outside the specification while making such conformity statement.
Various guides published by learned professional organizations like ILAC, EuroLab and Eurachem have suggested various manners to make decision rules for such situation. Some have proposed to add a certain estimated amount of error to the measurement uncertainty of a test result and then state the result as passed only when such error added with uncertainty is more than the minimum acceptance limit. Similarly, a ‘fail’ statement is to be made for a test result when its uncertainty with added estimated error is less than the minimum acceptance limit.
The aim of adding an additional estimated error is to make sure “safe” conclusions concerning whether measurement errors are within acceptable limits. See Figure 2 below.

Others have suggested to make decision consideration only based on the measurement uncertainty found associated with the test result without adding an estimated error. See Figure 3 below:

This is to ensure that if another lab is tasked with taking the same measurements and using the same decision rule, they will come to the similar conclusion about a “pass” or “fail”, in order to avoid any undesirable implication.
However, by doing so, we are faced with a dilemma on how to explain to the client who is a layman on the rationale to make such pass/fail statement.
For discussion sake, let say we have got a mean result of the fat content as 10.30 +/- 0.45%m/m, indicating that the true value of the fat lies between the range of 9.85 – 10.75%m/m with 95% confidence. A simple calculation tells us that there is a 15% chance that the true value is to lie below the 10%m/m minimum mark. Do we want to take this risk by stating the result has conformed with the specification? In the past, we used to do so.
In fact, if we were to carry out a hypothesis (or significance) testing, we would have found that the mean value of 10.30%m/m found with a standard uncertainty of 0.225% (obtained by dividing 0.45% with a coverage factor of 2) was not significantly different from the target value of 10.0%m/m, given a set type I error (alpha-) of 0.05. So, statistically speaking, this is a pass situation. In this sense, are we safe to make this conformity statement? The decision is yours!
Now, the opposite is also very true.
Still on the same example, a hypothesis testing would show that an average result of 9.7%m/m with a standard uncertainty of 0.225%m/m would not be significantly different from the target value of 10.0%m/m specification with 95% confidence. But, do you want to declare that this test result conforms with the specification limit of 10.0%m/m minimum? Traditionally we don’t. This will be a very safe statement on your side. But, if you claim it to be off-specification, your client may not be happy with you if he understands hypothesis testing. He may even challenge you for failing his shipment.
In fact, the critical value of 9.63%m/m can be calculated by the hypothesis testing for the sample analyzed to be significantly different from 10.0%. That means any figure lower than 9.63%m/m can then be confidently claimed to be off specification!
Indeed, these are the challenges faced by third party testing providers today with the implementation of new ISO/IEC 17025:2017 standard.
To ‘inch’ the mean measured result nearer to the specification limit from either direction, you may want to review your measurement uncertainty evaluation associated with the measurement. If you can ‘improve’ the uncertainty by narrowing the uncertainty range, your mean value will come closer to the target value. Of course, there is always a limit for doing so.
Therefore you have to make decision rules to address the risk you can afford to take in making such statement of conformance or compliance as requested. Also, before starting your sample analysis and implementing these rules, you must communicate and get a written agreement with your client, as required by the revised ISO/IEC 17025 accreditation standard.

Conformance testing is testing to determine whether a product, system or just a medium complies with the requirements of a product specification, contract, standard or safety regulation limit. It refers to the issuance of a compliance statement to customers after testing. Examples are: Pass/Fail; Positive/Negative; On specs/Off specs, etc.
Generally, statements of conformance are issued after testing, against a target value of the specification with a certain degree of confidence. It is usually applied in forensic, food, medical pharmaceutical, and manufacturing fields. Most QC laboratories in manufacturing industry (such as petroleum oils, foods and pharmaceutical products) and laboratories of government regulatory bodies regularly check the quality of an item against the stated specification and regulatory safety limits.
Decision rule involves measurement uncertainty
Why must measurement uncertainty be involved in the discussion of decision rule?
To answer this, let us first be clear about the ISO definition of decision rule. The ISO 17025:2017 clause 3.7 defines that: “Rule that describes how measurement uncertainty is accounted for when stating conformity with a specified requirement.”
Therefore, decision rule gives a prescription for the acceptance or rejection of a product based on consideration of the measurement result, its uncertainty associated, and the specification limit or limits. Where product testing and calibration provide for reporting measured values, levels of measurement decision risk acceptable to both the customer and supplier must be prepared. Some statistical tools such as hypothesis testing covering both type I and type II errors are to be applied in decision risk assessment.
One of the most important properties of an analytical method is that it should be free from bias. That is to say that the test result it gives for the amount of analyte is accurate, close to the true value. This property can be verified by applying the method to a certified reference material or spiked standard solution with known amount of analyte. We also can verify this by carrying out two parallel experiments to compare their means….
This is a follow-up of the last blog. Read on ……